
The heat wrap on a glass blunt is heat shrink similar to what an electrician would use. You may need to know how to change it for two reasons.
- It is either old, wearing or weakening and time for an update – or,
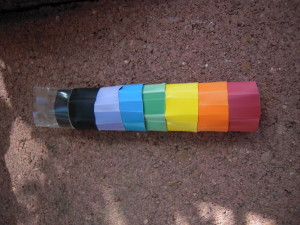
- it is NOT worn at all but you just can’t wait to use those other colors you got! (only available for 12mm pieces – classics and minis – No deluxe)
You must perform this at your own risk! - My glasss blunts are created from very durable borosilicate glass, however, that does NOT mean they are indestructible! These steps are suggestions based on the way I do them in the studio. I am a professional glass artist and have been very close friends with glass in all forms for over 15 years! It is NOT rocket science! Please use caution and common sense when working with ANY GLASS. After all - it is in the NATURE of glass - to BREAK.
- Don’t worry about heating the glass – it is not phased by these temperatures. (Meaning normal use of a lighter or heat gun.)
- You’re on your own should you choose some crazy non-sense completely over powered for the job! ie: You should NOT do this with any type of torch, windproof or other high heat / pressurized flame.
- This can, on the other hand, be done with a hairdryer although that will take a bit longer to create the120-degree temperature you need and can result in a poorly or unevenly shrunken wrap. (But if all you have lying around are torches… USE THE HAIR DRYER!).. Can’t say I didn’t WARN YOU!
What you will need:
- Replacement parts kit.
- The glass blunt you are revitalizing or customizing.
- A sharp knife (small paring knife), X-acto® or other box type cutter. (PLEASE use caution with ANY blades!)
- A regular lighter or commonly available heat gun (preferred).
- Don’t forget that common sense!
To Begin:
Note: I have pieces that are over 2 and 3 year old that are still “OEM”! 😀 This process is mostly for those wanting to customize colors as the heat wraps do not tend to wear much. A loose heat wrap can generally be retightened by applying heat.
- Remove the mouth piece from your glass blunt - just pull it all the way out.
- Destroy and remove the old wrap if it is not already.
- Slide the tip of your blade between the heat wrap and glass.
- PUSH the blade AWAY from you while slicing the length of existing heat wrap.
- Remove the old, cut wrap and discard in the garbage can.
- Yes - you need to slice it and remove - they are not interchangeable or reusable.
NEXT
– Starting with the now “naked” blunt body, fresh wrap and clean mouthpiece.
Slide a new wrap over the “Tippy Toes” on the base end where you’ve removed the original wrap.
MAKE SURE TO REPLACE THE MOUTHPIECE at this point.
-If you forget the NEW wrap will shrink TOO much in which case you may find yourself having to start over and possibly order [and wait for] a new one.
BEFORE HEATING ANYTHING….
Align all 3 parts according to your preferred final placement. **Note that the shrinking process will shorten the wrap slightly as it is heated.
Do NOT short your wrap on the mouthpiece side or you may not achieve a proper seal. Better safe than sorry – cooled heat wraps can be trimmed if you find it is too long afterwards.
Okay moving on…with your chosen source of heat – you will shrink the NEW wrap over the base to secure the mouthpiece.
- It should only take about 25-30 seconds to shrink.
- **If you are using a lighter – keep the flame far enough away from the heat wrap as to not melt it. Heat wrap will shrink at approx 120 degrees – For this, the radiant heat at the tip of the flame is sufficient (not even touching the actual flame) – Touching the flame can cause melting and/or ugly black soot which is visible on some color wraps.
Fire up that heat source – Let say for the majorities sake it is a lighter.
- Hold your blunt over the flame where the wrap needs to be warmed to shrink – again DO NOT TOUCH THE WRAP WITH the flame.
- Use a sweeping motion (left to right) – you must move either the glass or the heat source to keep thing evenly warm. It is easiest in my experience to brush with the heat in my dominant hand while I rotate the glass with my other hand.
- Rotate the piece toward and away from you – rotations will help the mouthpiece stay centered.
- Ensure the entire surface is warming evenly – The wrap itself will help you determine this as it shrinks. You basically want to be “chasing/following” the shrinking with the heat.
- It’s not a race – slow and steady works best for a smooth – evenly applied wrap.
You should NOW have a newly sealed piece.
Make sure to let the entire thing cool completely before checking for “slide” or you could stretch and weaken your new wrap.
From there – if you find it to be stuck – here is the link you need: Let me know if you have any other questions and thanks for this one! I’ll work on getting the video edited and posted ASAP!